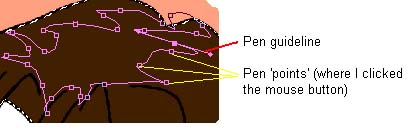
 Figure 5.1 - Flat colours on line art | Starting point: You have a large photoshop file with three layers: - a black and white line art layer - a flat set of colours between the line art and background layer - a coloured background layer Lesson 5ii)Now create a new layer between the Flat Colour and Line Art layers by clicking on the new layer icon in the layers window. Name it 'Shades'. 5iii) The highlighted outline you chose should still be visible on the new Shades layer. This is where you get to play with paths! 5iv) Think of an area that you would like darkened. I'll choose Themegirl's hair parting. I want that star-shaped pattern that occurs in anime people's hair partings, so I'll draw that in with the pen tool. The trick with the pen tool is to work with a large image (mine was at 66.67% of the enormous file) and to hold the mouse button down and drag for a little while when you've reached the points that you want to define. This extends the pen tool guidelines for each point, making it easier to adjust the shapes of your pen paths later on. Click in this manner all the way around the shade-shape that you want to create until you reach the starting point. Click on the initial point that you clicked to close the path. note- you don't have to click within the shapes once you reach the selection boundary that you chose in the first step. You can go over the selection boundary, and PS will only colour within this boundary. You can see in my own path below that I went over and out of the selection boundary :)
5v) If you need to adjust any of your points, press P until the arrow tool appears. You can now use the arrow to pull on the pen guidelines to lengthen, shorten or skew them. You can also choose the pen 'points' and move them as well. Adjust until you're happy with the final shape. 5vi) Now go back to the Flat Colour layer by clicking on it in the layer window and choose the burn tool (press O until the little hand appears in the Tools window), and choose one of the large hard edged brushes from the Brushes window. Now choose a spot within the path that you made and click on it with the Burn tool twice. Don't forget that you're doing this in the Flat Colour layer! 5vii) You'll notice that the spot you clicked becomes a couple of shades darker than the areas around it. Choose the eyedropper tool (I) and choose that darker shade. 5viii) Now go back to your Shades layer by clicking on it in the layers window. 5ix) Click on the Paths tab in the Layers window. Make sure that Work Path is highlighted, and click on the little menu options arrow on the top right corner of the window. Choose Fill Subpath, then Use Foreground Colour. Click OK. This will colour in that path selection with the darker shade. 5x) Now you can drag the used path onto the trash icon to delete it. Select the Pen tool again and draw in another area that you want shaded. Continue to colour in your darker shades in the section of flat colour that you chose initially (ie from step 5iv onwards). When you've finished with this section, choose another section (such as Themegirl's skin) and shade in the darker shadows in the same way, starting from step 5i. 5xi) Now do your light shades in the same way- choose the section from the flat colours, picture the shape of the highlight and draw it in with the pen tool. The only difference here is that you use the dodge tool (press O until the pin shape appears) instead of the Burn tool, and select the colour so that it becomes two shades lighter. Now fill the subpath as normal. Keep doing this until you've shaded your entire drawing. I'm not going to talk you through it, because this tutorial is already eleven points long :). 5xii) And now it's twelve points long! When you're finished, slap in whatever background you want, choose Layers>Flatten Image, and then resize the image to something decent. Save it as a JPG or GIF or even a PNG, and you're done! Finishing up: |
Gallery of Host
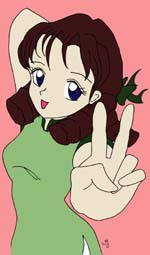
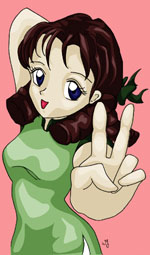
Take a look at what people have done with this tutorial! Send in your own- link it through the guestbook!