|
Figure 4.1 - Transparent image |
Starting point: You have a large photoshop file with two layers: - a transparent and protected line art layer - a coloured background layer
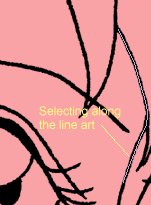
Lesson 4i) Create a new layer between your background and line art layer by selecting the background layer, then clicking the New layer button. Name it 'Flat colour'. 4ii) Choose a region that you want to colour. It's always best to start from the back and work forwards (ie colour the skin before the eyes because the eyes are closer to you than the skin is). So let's choose the skin. Zoom in to one of the edges of the skin (z, right-click on the area, choose 'actual pixels'). 4iii) Argh! It's huge! That is a good thing, though... Choose the lasso tool (L), and in the 'Flat colour' layer, hold down Alt and click along the inside of the lines of the skin to create a selection based on short straight lines (see diagram below). Continue going around the entire perimeter of the skin until you reach your starting point. Now you can release Alt, and your skin section will be selected (yay!).
4iv) Choose a suitable skin colour, and press Alt-backspace to fill in the selection with that colour (make sure that you're working in the Flat Colours layer!). This is where the coloured background comes in handy... if you can see it showing through in any parts of the section you wanted to colour, you can go back and select that area (using the lasso just over that area) and fill it in (Alt-backspace). 4v) Press Ctrl-D to deselect everything. Now you can repeat step 4iii) for all the other bits to get a nice coloured (but unshaded image). We will do shading in the next few tutorials. For now, have a rest ^_^.
Finishing up: |
Next tutorial: Shading your line art